Tuesday, August 17, 2021

Heffy Doodle, Maker Forte, and SugarPea Designs Collaboration Blog Hop


Welcome to the Heffy Doodle, Maker Forte, and SugarPea Designs Collaboration Blog Hop! Design Team members from all three companies are sharing inspiration using products from all three companies!

I made a couple cards for this hop. For my 1st card, I used the adorable Heffy Doodle Sealy Friends set, SugarPea Design Sunburst & Wave stencil.


I started by die cutting the scallop background with SugarPea Card Front Element Builder dies. Then, without removing the dies, I layered the wave stencil and add blue ink blending. Next, I layered the sunburst stencil and ink up a couple different yellow hues. Once this done, then, I removed the dies. Adhere the panel to this pretty soft green Matcha cardstock from Maker Forte. This is my favorite soft green cardstock. Next, I colored the seals and the clouds (from Heffy Doodle Quack Me Up set). Fussy cut them and then adhere them to the card. Finish by stamping the sentiment, add some shimmer and some enamel drops.


Now, for my 2nd card, I completely switch gear from cutesy to floral.


For this card I used this gorgeous Hugs set by Alex Syberia Design for Maker Forte. I inked it up using Maker Forte Eclipse Black ink. And, wow... I am not usually easy to impress when it comes to ink, but this black ink is solid dark black. And it works perfectly with any alcohol markers. Colored the flowers and once finished, trim the panel and adhere it to the Matcha card base. Finished by stamping the sentiment from SugarPea Floral Envie set and add some enamel drops.


BLOG HOP DETAILS:

To be entered to win the giveaway, all you need to do is comment at each stop along the Blog Hop!
Maker Forte will be giving away $35, Heffy Doodle will be giving away £25, and SugarPea Designs will be giving away $25 to their respective stores!  Be sure to comment before 11:59 PM EST on Aug 20th to be entered to win!

Each company will post their random winner on Aug 21st at 10AM EST!  Make sure to check the Heffy Doodle Blog,  Maker Forte Blog, and SugarPea Designs Blog to see if you’re a winner!

From here, the next stop is SugarPea Designs Blog. In case you missed any link, below isthe compelete list for the hop. Thank you so much for joining the fun.


Blog Hop Lineup:


you are here --> Vera Yates <-- you are here

Friday, August 6, 2021

Spellbinders August Card Kit & Stamp of The Month

 It's that time of the month again, where I get to play with Spellbinders Card Kit of The Month. This month's theme is Art School and it is filled with so many fun paper, stickers and embellihsments. I love rainbows, so this kit definitely right up my alley.

Let's take a look at what's included in this kit, shall we? It's full of happy colors. :)


And, below are the cards I created with this kit.


I made this first card with someone that I admire in mind. She has mad artistic skills and can paint and draw beautifully. I plan on sending this card to her. I simply trim a couple patterned paper for the background and then arrange the various embellishments on the card. I also stamped the artist using the included stamp set on this kit. Colored, fussy cut and adhere to the card. Finish by adhering the sentiment.

Same thing with the next card. Except on this card, no stamping at all!! The benefit of using a kit, I can just play with the included embellishments. Simply choose the ones you want to use and voila it all come together quickly.


My next card is even quicker. I literally just adhere the patterned paper to the card base, add sentiment sticker, puffy heart and finished by die-cutting and color some flowers. I love this particular patterned paper as it has Frieda on it and one of my best friend love her. So, yep, this card will go to her.


4th card is this owl card. Again, I used one of the patterned paper from the paper pad and this time I played with the paint tube and paint palette dies.


Die cut all of them and then arranged them on the card. The owl and the cup with tools are the ready made embellishment that I simply adhere with foam adhesive. The sentiment tag I adhere with regular liquid glue. 

And, last but not least, is this card that I made using August Clear Stamp of The Month


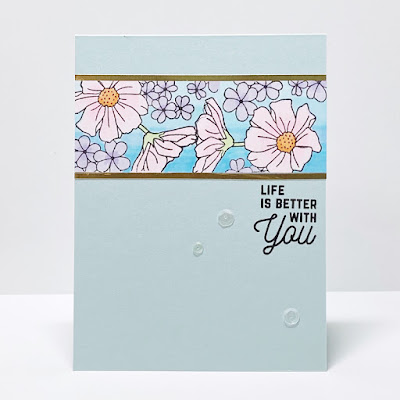
I stamped the flower in various angle to create the pattern strip and colored the open area with various blue Copic marker to create the gradient look. Once I am happy with the coloring, trim and adhere to card. Add strips of gold, add sentiment and finished with some sequins. That's it, peeps. All in all, these 5 cards came together in just a few hours. I think I spent more time debating which embellishments to use. Putting them together takes no time at all.

Well peeps, that's all from me today and I hope you enjoy the kit's inspiration. Happy Friyay!!

Thursday, August 5, 2021

The Ton August Release

Hi all and welcome to The Ton August release. Let's get on with it, shall we? For my first card, I am using the new Cosmos Border cling stamp.


How gorgeous is this border set? So fun to color and I went to town with my kind of coloring. I am so happy with the way this card turned out. Simply stamped and colored. For the sentiment, I used the Happy Birthday  sentiment from another new set called Charming Cosmos. The small sentiment is from a previously released set called Heartfelt Blossoms.


For my next card, I used the pretty flowers and sentiment from Charming Cosmos


I know I wanted to use the sentiment, so I started with that. I stamped with my favorite green Matcha ink and then die cut it with one of the square from the Double Pierced Square Nested Dies. For the flower I used Bubble GumDolled Up and Coralline ink. Stamped and die cut the flower and put aside. For the leaves I used the new set Multi Monsteras and inked them using Honey Dew & Spring Salad. Now, time to put them together. Adhere the sentiment and arranged the flowers and the monsteras leaves with foam adhesive. Finished by adding some sequins.

There a few more sets being released and you can see them by visiting The Ton blog and of course, there's even more inspiration. Please stop by  my teammates blog and you can see their beautiful creations. Hope you enjoy today's release and thank you so much for stopping by here.

you are here -->Vera <-- you are here

Tuesday, August 3, 2021

Circle Kaleidoscope

 As promised,  today I am  back with another Christmas cards. I am tempted to do 31 Christmas cards in 31 days for August, but I realized that's unrealistic for me. My work load at the office been crazy and I would be crazy to try to add more load to what I already have going on. So,  I am happy with whatever I can accomplish as time allow.

For today's card, I am showcasing this beautiful Circle Kaleidoscope Slimline Etched Dies from the Slimline Collection.


How elegant is this set? I really love open circle patterns on the background. And, I think the layered circle/ornament is simply beautiful. I started by die cutting the open circle background. Trim and adhere to card base. My card size is 3.5" x 8.5". Then I simply die cut each layer of the ornament, adhered them together and add to the card. Add the ornament hanger as well. For the sentiment, I hot foil the Merry Christmas from  Holiday Sentiments Glimmer Hot Foil Plate Holiday 2019, trim and adhere to the card. 


 Just for fun, I decided to make another card, this time with bolder color.


Two cards using same dies, same steps with 2 different look. I always find it fascinating how changing colors can change a feel to card. I love the way both cards turn out. Do you have preference? Softer color or bolder color?


Well peeps, that's all from me today. Hope you enjoy today's cards. Cheers...

Monday, August 2, 2021

Christmas Gnomes

 Hi all. Wow, we're already in August and that means I need to start working on my Christmas cards stash. I know, I know it's still summer, but with limited crafting time, I definitely need to plan and work in advance.

Lucky for me, Spellbinders just came out with some fun & cute Christmas set. Since, I love gnomes, I am excited that I get to play with this new Holiday Gnomes Clear Stamp from the Be Merry Collection.


There's just something about gnomes that I love. And, this set totally calling my name. For this card, I really just want the gnomes to take center stage. I simply stamped, colored and fussy cut the gnomes. Next, I adhere them to the card base with foam adhesive. Finished by stamping the sentiment from Home for Christmas Sentiments & the heart.


Clean and simple with pops of colors. Are you fans of gnomes? And, have you started working on your Christmas cards?

Well peeps, if today is all about adorable gnomes, stay tune as tomorrow I will have more Christmas card to share and this time it'll be all about detail and elegance. Hope your week starts off wonderfully. 

Playful Watercolor

Hi friends. Happy 2025! Hope you all started this year in a wonderful way. For this year, my intention is to creat emore with sets that I al...