Monday, May 24, 2021

Sweet Cardlets II Collection

Hi all. It's been raining the last few days on my neck of the wood and I feel like some cheerful cards are needed to brighten the day. For my 1st card, I used Spellbinders' You are My Home Glimmer Hot Foil Plate & Die Set from Sweet Cardlets II Collection by Becca Feeken. I think this card is really appropriate with the rainbow foiling. After all only after the rain we could see the rainbow, right?


To start, I did hot foiling of the homes plate using the Mini Rainbow  Hot Foil. Once that done, I trim the square home plate. Next, I did hot foil to the postage frame and adhere the square of the houses to the frame.  Then on a piece of white panel, I hot foil the sentiment using Aura Hot Foil. I figure this way is a safer way to make sure the foiling for the sentiment is perfect before I adhere the framed square of houses.


I love the way the rainbow foiling look for this design and decided to not color the houses. Just let the foil shine. 

For my next card, I used the sweet Deer Friend Glimmer Hot Foil Plate & Die set.


How sweet is this deer? I just  love it. Here, I foiled the deer and the flowers with Blush Hot Foil Roll. Color the flowers with Copic. Next, I hot foil the geometric frame from Geometric Floral Hot Foil Plate set with Aura Hot Foil Roll. Adhere the panel to card base and then adhere deer and floral with foam adhesive. To finish I hot foil sentiment from Everyday Sentiment II set.


The rainbow card definitely super bright and the second card has more pastel feeling to it. But, making these 2 cards sure help brighten my days and I hope it inspire you to try hot foiling as well. That's all from me today. Wishing you all a wonderful day.


Tuesday, May 18, 2021

Spellbinders Clubs Blog Hop


Hi all and welcome to Spellbinders Clubs blog hop. If you've been hopping along, you should arrive here from Natasha Vacca blog.

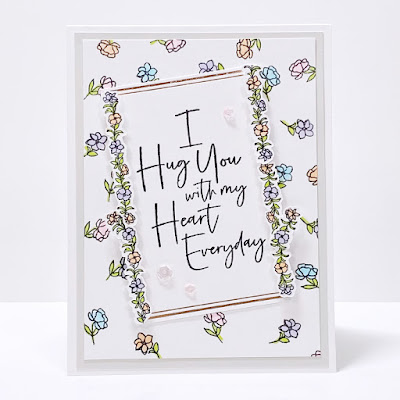
For my card today, I am showcasing the set from May Clear Stamp of The Month Club.


For the background, I used a couple of the flowers from the set and stamped them repeatedly to create the pattern background and colored them with Copic. Next, I created the rectangle frame with hot foiling using Essential Duo Lines Glimmer Rectangles Hot Foil Plate. Stamped the sentiment from the May stamp set. Adhere to the panel. 

Layer the white panel with gray panel and adhere them to card base. Stamped the flower border a few times, colored with Copic and die cut. Arranged them on the side of the rectangle frame and finished by adding some sequins.


Giveaway:
To celebrate this release, we are giving away a $50 gift certificate to 3 lucky blog readers – selected from the comments on our blogs. Giveaway closes on Sunday, May 23rd, 11:59 pm MST. The winner will be announced in this blog hop post the following Tuesday, May 25, 2021. The winner is responsible for shipping cost, duties and taxes.

Please note, store credit (gift certificate) cannot be applied to Club Subscriptions. Store credit can be applied to shop past Club products, Club extras and regular releases.

Edited to add: The winners are: Mary Patrick, April W, Frances M Ibanez. Winners have been contacted. Congratulations!

How about some more amazing inspiration? From here,  your next stop is Amanda Stevens. In case you miss any link, below is the complete list of today's hop participants. Thank you so much for stopping by here and I hope you enjoy the hop. Cheers...

Saturday, May 8, 2021

Rainbow Hot Foil Foliage

 Hi all. I am really into playing with hot foil at the moment. There's certain satisfaction when you peel back the foil and see the pretty shimmer on your card.

For my card today, I used Spellbimders Essential Duo Lines Glimmer Squares Glimmer Hot Foil Plate.


I start by hot foiling one of the square from the set with Spellbinders Mini Rainbow Stripe hot foil roll. Love how pretty the result is. Since it's pretty colorful, I decided to keep the card simple. Just let the design shine, like literally. Trimmed the square and I stamped it with sentiment from Spellbinders Clear Stamp of The Month Club (May)

Next, I heat foil the leaves from Organic Foliage Glimmer Hot Foil Plate & Die Set from Foiled Basics by Yana Smakula. Swoon... the leaves come out gorgeous! Die cut the leaves. Then, arrange the stamped square panel and the leaves. For the leaves, adhere them with foam adhesive. Finish by adding some enamel dots.


There you go, here, up close you could see the pretty shine. Are you getting into foiling, yet? If not, I encourage you to give it a try. Well, that's all I have for today. I wish you all a lovely weekend. Take time to enjoy the outdoor. Have a blessed day everyone.

Thursday, May 6, 2021

The Ton May Release

Hi all and welcome to The Ton May release. I am so excited for this release. So many beauties!! The ton is releasing 10 new stamps, 3 stencil and 1 floral pop up dies. My flower lover heart totally loving this release. Let's start with my favorite from this release.

First up, is the Peony Print Layering Stencil with coordinating die. I love this set!


For this card, I simply did ink blending on each layer of the stencil to create this floral background. Then, I stamped and heat embossed the Wonderful sentiment from Jumbo Sentiments on a piece of vellum ad then die cut it using the coordinating Jumbo Sentiments die. Stamp the "you are" using Grand Fuchsia, die cut and adhere to the card.

And, to mail out this card, I use Rose Pretty Mail set to decorate the envelope.


I used Soft Ash ink to stamp the image as I feel using black ink might be too strong or make the envelope looks too busy. I just love soft colors. :)


For my next card, I used the classy and elegant Grouped Fresh Garden Roses and paired it up with Many Banners set.


Super fast and easy card. Simply stamp each layer, die cut the roses with the coordinating Grouped Fresh Garden Roses dies. The colors I used are Whisper Pink, Peach Blossom & Coralline. Adhere all the parts to the card base and then simply add the sentiment banner. And, of course as usual I like to add some enamel dots to finish my card.

For this next card, I used popsicle stick to create the fence look. A few years ago, I had card that was published on Paper Crafts magazine using popsicle and I thought I'd create another card using the same supply. To be honest, this card with the popsicle stick been sitting in my drawer for 2-3 years. I know, crazy right? Finally, with this Blossom Branches set I feel like I found the right set to use with this card base. Anyone else did this, keeping half done card for years? Or am I the only crazy one? Hm... on second thought, don't answer that. Hah!!


Last but not least, I am sharing the Hibiscus Pop-Up dies with coordinating stencil. You can watch the video on how to color and assemble all the parts HERE.


How pretty is this? For me this is like a sweet surprise inside a card. I simply adhere this to a card that I have previously finished. This just an extra oomphh to the card, don't you think?

Well peeps, that's all I have to share for today. I hope you love this release as much as I do. What catch your eyes? Need more inspiration? Please check out what The Ton team has created using the new sets. I wish you all a beautiful Thursday. Cheers.

you are here --> Vera <-- you are here

Wednesday, May 5, 2021

Blooming Floral Cards

Hi all. I am excited to share today's cards featuring some hot foiling. I have always love the look of foil and for the longest time finding them a bit intimidating. Sure, I played with hot foil here and there & had quite a few foils sitting in my drawer, but never really got into it. Till recently. I decided to take the plunge and really spend some time playing and figuring out what setting works best to the point where I am pretty comfortable in creating with them. So excited and I have a couple cards to share.

Here's my 1st card.


For this one, I used Spellbinders' Blooming Floral Background Glimmer Hot Foil Plate & Die Set and 
Diamond Floral Frame Glimmer Hot Foil Plate & Die set from Yana's Blooming Birthday Collection. Started by hot foiling the floral background on a piece of white cardstock. The plate only cover half of the panel, so repeat the process to cover the other half of the panel. Once this done, I did some ink blending on the panel as I want a really soft color panel.

Next, I hot foil the diamond outline and several of the flowers. Oh yes, for both cards, I used Glimmer Hot Foil Blush and Aura. Die cut the diamond and adhere to the panel. Next, arrange the flowers and adhere with foam adhesive. Hot foil and die cut the sentiment from Yana's Special Sentiments Glimmer Hot Foil Plate & Die Set and again adhere to the panel with foam adhesive. Glued the panel to card base and finish by adding some enamel dots.

On to the 2nd card. :)


From soft blue, we switch to some pink. For this card, I was using the same sets as before and repeat the same process. However, instead of ink blending, I colored the floral background with Copic markers. And, this time instead of the diamond outline, I used Essential Duo Lines Glimmer Circles Glimmer Hot Foil Plate

I am so happy with the way these cards turned out. They really are quite shiny in person. :) What do you think? Are you into hot foiling? Are you interested but feel intimidated at the same time, just like me? If yes, I encourage you to give it a try. I feel like, I have new toys to play with. Hah!! Well my dear crafty friends, that's all from me today. I hope you enjoy today's cards. Thank you for stopping by here and happy Wednesday!

Saturday, May 1, 2021

Spellbinders May Card Kit: Beach Day

Hi all. Happy May. I am excited to  share the projects I have created using Spellbinders' May Card Kit of The Month, which has beach day theme.

This is my first time to join any club kit and am pretty happy with how fast it is to create cards using a kit. I guess, having everything coordinate really helps. Let's take a peek at what included on the kit, shall we?


As someone who loves the sea, this kit totally make me want to go chill on the beach. And, I am excited that this kit inspire me to branch out and try out new style.


For my 1st card, I used the anchor dies on one of the patterned paper from the paper pad that's included on this kit. Adhere it to the card base using foam adhesive. Next, I played with the printed pieces, arranged and adhere them to the card. Finished by adhering the sentiment sticker. Lookie here,  no stamping!! This card all sticker & printed papers. And, I thought the bid looks pretty cool with the straw hat. :)


For my 2nd card, I cut a strip of the patterned paper to ground my complication. Then add all the printed designs. Stamp the sentiment from stamp set and finished by adding the glittered enamel dots.


For my last card, I trimmed one of the patterned paper at an angle. Next, I arrange and adhere the various printed design. To add texture and layers, I die cut a flower & leaf using the dies from the kit. Add them to the ensemble. This way the card doesn't look too flat. Finish by gluing the sentiment strip.

There you go, 3 fun and quick cards that you can make from this fun kit. What do you think of this Spellbinders' May Card Kit of The Month? Do you subscribe to the kit already? I feel pretty invigorate as these cards are not quite my typical style as I mostly create with stamps & dies. I love the way they turned out and I hope you do, too. Well peeps, that's all from me today. Hope you're having a wonderful weekend. Cheers..... 

Playful Watercolor

Hi friends. Happy 2025! Hope you all started this year in a wonderful way. For this year, my intention is to creat emore with sets that I al...