Showing posts with label May Arts. Show all posts

Monday, January 20, 2014

You Make Me Smile

Happy Monday! I am so happy that my mojo finally coming back. During the holiday season, I had no mojo whatsoever and was struggling when it times to create. This weekend, finally after hours of browsing on Pinterest, my mind finally start whirling and I spent my Sunday in my craft room. Yay... 

For a while, I was worried that my creativity and passion for card making is fading away. Soooo happy that it's still here. :)

I created a few projects, but they are for submission. So, for today I am sharing an old project that I believe I hasn't share here.


I love this red bird. I used my trusted Silhouette to make this bird from acetate sheet. To color it, I used Tattered Angel glimmer glaze, then stamped with the handwritten background and heat embossed with gold. And, the pretty silk ribbon is from May Arts. They have the best silk ribbon!!

Oh... and today is  my day at CardMaker blog. My first post as their DT member!! So excited. For my first assignment, I get to share my crafty space. Eeekk.... There were some cleaning frenzy going on after that to make everything looks decent. LOL. I am a messy crafter.

You want to see my crafty space? Check it out at CardMaker blog. Do you have pic of your crafty space? Leave the link on the comment below, so I can check them out. :) Have a fabulous week,everyone!!

Monday, February 4, 2013

May Arts Valentine's Blog Hop


Hi everyone and welcome to May Arts Valentine's blog hop week. All the Ribbonista are participating in this hop to provide you with a week of inspirations.

For today, there are 5 blogs that you can visit (see links below), including mine. Since it's Valentine theme, I go with pink for my card.


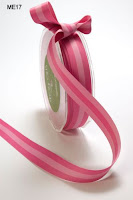
For this card, I used May Arts solid reversible stripe ribbon (ME17) and sheer dots ribbon (JD22). 

 pictures courtesy of May Arts

At first I was going to use just the stripe ribbon, because it is so pretty already on its own. On one side it's soft pink, dark pink, soft pink and on the other side it's dark pink, soft pink, dark pink. Love double sided ribbon. However, since the ribbon width is 3/4" I'd end up with pretty thick/big bow. Not in proportion with my card. So, I decided to layer it up with the sheer dot one.

I simply cut a slit on the the fold of the card and thread the ribbon through it.

The patterned paper is from Carta Bella, die cut & emboss with Spellbinders frame die. And I distress the edges a little bit with distress ink. Then, die cut and stamp the key (from Papretrey Ink - Key To My Heart set) and add it to the layer and finish by adding a banner stamped with sentiment.

Simple but still elegant & romantic. 

I hope you will join us and hopping along. As always May Arts is very generous with their giveaway. The lucky winner will get 4 spools of ribbon of their choice. Please check out what the other Ribbonista has created and leave some love along the way. Thank you for stopping by here and may your week starts off wonderfully!

Wednesday, January 23, 2013

May Arts & Cardmaker Magazine Blog Hop


Hi everyone and welcome to May Arts & Card Maker magazine blog hop. We are teaming up and bringing you plenty of fab eye candy. If you arrive here from Susan Lui's blog then you are on the right track.

Let's get on with the program, shall we?


Here’s what I used to create this card:
Patterned paper: (Bright Side petite paper pad) Lawn Fawn, (Indie Chic Saffron  6x6 paper pad) My Mind’s Eye
Ribbon: May Arts satin reversible (RP22)  & double faced faux suede (XV17)
Wood dies: Bird from Studio Calico
Spray mist: Tattered Angels in Caribbean Blue
Pearl stickers: Recollection

In case you are wondering, on the card you see 3 colors of ribbon, but I only list 2 on the supply list, it’s because one of the ribbon is double sided. Isn't it a gorgeous color combo? One of my favorite ribbon!

Now, the how-to:
1. Cut a panel the same size as the card.
2. Cut 3 strips of ribbon, about 5” long, snip one end into fish tail and adhere them to panel (see below).  Once that done adhere the panel to card.


3.  Then cut 6 more strips of ribbon. Three 6” long and three 5” long. Fold each end to the middle and you’ll end up with 6 folded ribbons. Sorry, the picture only shown 4, by the time I remember the other ribbon, I already adhered the ribbons to my card.


4. Layered the folded ribbon on top of the ribbons on the panel.
5. Stamp sentiment, fussy cut it, and layered it with patterned paper and adheres on top of the ribbon with pop-dots.
6. Spray the bird wood die with spray mist. Let it dry and adhere to the top corner of the sentiment.
7. Add some pearl stickers.

And, of course as always, May Arts is generous with their hop prizes. Simply leave a comment and we will randomly pick a winner who get to choose 4 spools of ribbon of their choice. You don't have to leave comments on each blog, but the more blog you leave comment on the higher your chance. :) 

Hm... some enabling... May Arts have several fabulous new ribbon coming out. My favorite is the denim one! If you have any question about any of the ribbon just let me know and I hopefully I can direct you to the right direction.

From here please hop on over to my team mate Virginia Fynes. If you miss any link, please go to May Arts blog for complete list of participants. Thank you for stopping by here.

Tuesday, December 18, 2012

May Arts Holiday Blog Hop


Hi everyone and welcome to day 2 of May Arts Ribbonista Blog Hop. All week long all May Arts ribbonista is sharing fun and fabulous holiday projects.  In case you miss yesterday's hop,  you can check it out HERE.

For my post, I decided to make several cards. For the 1st card, I start with this poinsettia  flower card using the grosgrain ivory stripe ribbon (RG46).  The poinsettia was made using my favorite tool ever, Mister Q (my Silhouette love name) and Core'dinations cardstocks.


This card is pretty quick to make. Here's a quick  how to:
1. Cut a strip of ribbon and adhere to card.
2. Cut poinsettia using Silhoutte and adhere to ribbon.
3. Stamp sentiment.


Next, I decided to do wreath cards. This first wreath one I made using sheer dots ribbon (JD46). The circle sentiment stamp is from Papertrey Ink & the bird is from Paper Smooches. Same poinsettia like above, just in smaller scale.


I made this wreath ribbon for May Arts summer post. In case you miss the post, here's the how to for this card:
1. Cut a circle ring.
2. Cut about 18" long ribbon and add a bit of glue to the back of the circle ring and adhere the ribbon and start wrapping it around the ring (the length of the ribbon would depend on how large your ring and the width of your ribbon. But, for card, I find 1/2" and 5/8" width ribbon work best).
3. Stamp circle sentiment on card.
4. Adhere the wreath to card.
5. Cut poinsettia using Silhouette (or you can also use ready made sticker) and adhere to wreath.
6. Stamp bird, color, fussy cut, and adhere to card.

For  my last card, I went with slightly unusual Christmas color combo by throwing in the light blue color ribbon (JD34). Same step like above.


Of course, you know how generous May Arts is. They're also doing giveaway for the hop. Leave comments along the way and you could win some fabby ribbons. Here's the list of the ribbonista for today's hop:

Jingle 
Karen
Kendra
Vera < --- you are here
Ashley

Tuesday, October 2, 2012

Ribbon Background

Quick post today as I am swamped at work. I want to share this card that I made for May Arts blog and it was posted there last week (you can see the full post HERE).


The ribbon I used to make the background is one of my favorite new ribbon from May Arts. I just love it. What do you think of this ribbon?

Sorry for the short post. So much going on at the moment. I do appreciate you taking the time to visit my blog and I apologize for being behind in leaving comments. I do try to keep up through my google reader, though. Hope you all have a wonderful day.

Thursday, July 12, 2012

May Arts Project

Hello there lovely peeps. As some of you may have known, this past year I've been on May Arts DT and I truly love being part of their DT. This time, I made it again to their top finalist for 2013-2013 term and today, I am sharing a project that I am  hoping will get me selected to be part of their DT again.

 As you already know May Arts carries so many beautiful ribbons that you can use for all kind of projects. For me, my favorite kind of projects is the ones that related to card making of course.

This time, I am sharing a card that utilizes three different kinds of ribbons. I think when people think of ribbons on card, we tend to immediately think of bow. But, the truth is we can use ribbons on card in many different way. You can use it to create your own embellishment, as border, as background, etc.

Here’s a look at my card using ribbons and no bow in sight. :)


My supply list to make this card:
- Cardstock
- Flower & leaves from Avocado Arts Thoughts & Smiles set
- Sentiment from Avery Elle Framed Fonts set
- Papertrey Ink Smokey Shadow Inkpad
- May Arts Lace Ribbon (390-38-09)
- May Arts Sheer Dots Ribbon (JD46)
- May Arts Grosgrain Ivory Stripe (RG17)
- Helmar 450 Quick dry Adhesive

How to:
1. Cut a panel slightly smaller than the card base. Adhere the grosgrain ivory stripe ribbon, tucking the end behind the panel.
2. Run a thin line of glue on the bottom of the grosgrain ribbon and layer the lace ribbon. Trim it to match the edge of the panel.  Adhere panel to card.
3. Make a ring or wreath base by cutting a circle with an opening on the inside. My wreath size is 3-7/8 and the inside opening is about 2 inch wide. And, don’t throw away the inside circle. Stamp it with sentiment and adhere to the ribbon border. Helmar 450 Quick adhesive is awesome for this kind of project.
4. Wrap sheer dots ribbon on the ring. I simply add a dot of adhesive at the starting point and then just wrap the ribbon around the ring. Add another dab of adhesive to secure the end. Adhere ribbon wreath to card.
5. Stamp flower and leaves, color (I used watercolor marker to color the leaves and copic marker for the flower), fussy cut them, and adhere to the side of the wreath. I only glue the bottom part of the leaves and leave the top part free for extra dimension.

And… there you have it a beautiful card that uses 3 different kind of ribbon.  I love the way this card turns out because even though I used more than one ribbon it doesn’t look busy. In fact it has a clean & modern look.  


I hope you enjoy this project and be inspired to use ribbons in your projects. Thank you so much for stopping by here and have a fabulous day.

Monday, June 25, 2012

New Kitchen

This weekend was a very productive weekend for me. We're finally getting new kitchen cabinets! Hubby had waited for 9 years for this. :) Through out the whole week, I cleaned out the old kitchen cabinets and we get rid of a lot of stuff.  It was quite liberating.  

And, our old kitchen cabinets didn't go to waste either. One of our vendor took it to use at his place. Love it when things get recycle and go to good use.

We pretty much been working on beautifying the house since we got together. There's certain satisfaction to see the house coming together and getting better with each project we completed. And, lucky me that hubby is super handy. Many of the projects we did it ourselves, okay 85% hubby and 15% me. LOL. I am really good at supervising, though. :)

Now, we're pretty much done with any house project and we can just enjoy it. Today, the plumber and the electrician will come and then I should be able to put everything back. Yay!!

Since we're talking kitchen today, I thought I also share this apron card  that I made for Paper Crafter's Library post last month. 


And below is pic of the card with a gift card inside the front pocket of the apron.


Now, I have to brainstorm for birthday present idea. My birthday is coming  up in 3 days and hubby been asking what I want for my birthday and I don't have any answer for him. I know, I know a girl can't have too many stamps, but I think he wants to give me something special other than stamps. 

Every time I get a new shipment of stamps, he always joke, really you need more? LOL, I don't think he realize that I will always have a stamp wish list. Hubby's friends pretty jealous of him because I never ask for jewelry or anything like that. I told him I am way too practical for things like that. I only wear my engagement & wedding ring from him and necklace from my mom, so why would I ask for jewelry if I rarely take off these 3 standard staples?

Time to ponder and come up with some list... :) Have a blessed week everyone.

Tuesday, June 19, 2012

May Arts & G45 Blog Hop

Hi everyone and welcome to May Arts & G45 blog hop. All week long, both teams will be bringing you tons of inspirations. Each day you can hop around to 4-5 blogs and simply by leaving comments, you would be entered for this week giveaway. For a prize detail and for a complete list of the blog hop participants for each day, please go to May Arts or G45 blog.

As you might remember, the fist time I used G45 products marked the day I tried on vintage style, which to my surprise lead to an acceptance letter from Paper Crafts for vintage card category (up coming Nov/Dec issue). So, needless to say the vintage style kind of grow on me a bit.

This time I get to play with G45 beautiful Tropical Travelogue collection. And I am  glad that I can combine the vintage look with my CAS style. Here's a look at my cards.


For both cards, I cut out the flowers from the patterned paper. I mean seriously, you could get loads of cards made from this one collection. And, depends on how you use them , you can create a simple CAS card or a vintage looking card.

For the ribbon part, I used May Arts velvet woven ribbon (PV16). On the first card, I folded the ribbons a couple time and on the second one I just leave it straight. It's my first time playing with the velvet ribbon and boy, this ribbon is so lush (hah... I sound like a British, but that's the best way to describe this ribbon). ;)

Please check out these blogs and leave some love for a chance to win some May Arts & G45 goodies. Today's blog to hop to are:

Vera --- you are here

Thank you so much for stopping by here. Have a beautiful day!

Monday, May 28, 2012

Fun Filled Weekend

Hi lovely peeps! How was your long weekend? I started mine early, by leaving work early on Friday to pick up Laurel Beard who is in town for a few days. We went to check out the Archivers, where we met up with Gretchen and then because she's not feeling well, I took her back to my place so she can chill out. That whole afternoon, Laurel was nauseous due to her migraine med side effect and we basically drove around with her holding a plastic bag, which thankfully she didn't have to use. :) 

The next day, I spent the morning at the dog park with hubby and Eli the puppy. It's just so much fun watching him trying to keep up with the big boys. In the afternoon I went up to north Houston again  to pick Laurel up, this time for some pampering time. We got a pedicure with matching colors. Yes, we are cheesy like that! :) I seriously, just love having her around. She's so bubbly and she makes me laugh continuously with her no nonsense respond. And, her hubby, just as nice as can be. 

Here's a couple pics from our weekend.

Laurel finally get to meet Eli.

My favorite pic. No, I wasn't being camera shy, but the camera was
about an inch away from my face and that's just way too close. :)

Sunday, totally chillin' out day. Picked up some flowers from Home Depot and hubby panted some colorful flowers & started a little veggies garden on our backyard. I don't have green thumb at all, so I am leaving the gardening stuff to hubby who enjoys doing those kind of stuff. Monday, went to see Man In Black 3. Missed Frank the pug, but if you see the movie, you'll see a few reference to Frank. And... I want the pug puppy poster just like on J's house. Yes, I am a bit obsessed with pug. Ha.. :)

Then my girlfriend came over in the afternoon with her sweet toddler, Mia. Let just say, Mia and Eli enjoy each other company. They played non-stop all afternoon. As I typed this, Eli is totally crashing on the pillow, snoring softly  now & then.

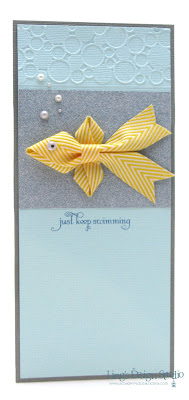
Of course, I made some cards, too. Quite a few actually. And, one of the card is this fish ribbon card, which is my last entry for Paper Crafts 2012 Gallery Idol. And, I know right away that for the encouragement sentiment I want to use the mantra "just keep swimming" from Finding Nemo. It is one that I often repeat to myself when things get a bit rough. 


I partially embossed the top part of the panel and added American Crafts glitter POW paper behind the fish.

I hope you all had a wonderful long weekend and yay... for short work week!!

Wednesday, May 23, 2012

May Arts Post

Hi peeps, today is my day at May Arts blog. This week we re teaming up with Core'dinations. Please check it out and if you would kindly leave some love, I'd so appreciate it. And, did you know that when you leave comments there during this week teaming up, you'll get entered for the giveaway. :)

Here's a peek at my card. You can see the full card HERE


It's also my day at SP & Company, and you can check out my card HERE. Thanks so much.

Wednesday, May 2, 2012

Ribbon Carousel & May Arts Blog Hop


Good morning everyone and welcome to Ribbon Carousel & May Arts blog hop. I love ribbon like I love cheesecake (which means I love it VERY MUCH) and I am thrilled to be able to join this hop.

For my card, I decided to make a welcome baby card since I have a feeling I will need this kind of card soon.


I had lots of fun making this card. I want the card to have celebratory feeling yet has softness to it since it's for baby. I feel the ribbon banners convey that feeling perfectly. For me banner represent the celebratory feeling and the soft colors lend the softness that I wanted. 

These yummy twill ribbons are from May Arts and yep... they are my favorite ribbons!! 

Now, that owl... I made it! Simply cut a rectangle out of brown cardstock, cut a curve on the top side of the rectangle (okay, since I am a bit of a perfectionist, I didn't free hand-cut this, I actually used my circle cutter to cut the curve). For the owl body, same thing, cut a small rectangle, but this time I used the oval cutter since it created a deeper curve. 

Use circle punch for the eyes, nip a triangle for the black part and cut a small triangle for the beak. I rarely made my own design, so when I do and the result is pretty adorable like this owl (a bit bias here... hah), I feel like patting myself on the back. :) Now, I am curious to know what you think of this card, of the owl.

Please check out  May Arts blog and Ribbon Carousel blog for the hop prize details.

Thank you so much for stopping by here and I hope you enjoy your visit.

Tuesday, April 24, 2012

May Arts & Authentique

Hi, just want t let you know that today is my day at May Arts. We are teaming up with the fabulous Authentique Paper company this week. Here's a look at one of my card. Check out the post HERE & if you leave comment on May Arts blog you'll be entered for their fabulous giveaway. Thanks for peeking in. :)


Tuesday, April 17, 2012

Gnome Love

Hi'ya lovely peeps! So, did you finish your tax or you file for extension? I am so thankful tax season is behind me. I think this year is a first that I waited til the last minute to file my tax. Normally, I get it done a month before, but this time I was just dragging my feet.

I mean... oh should I do my tax or should I make cards for submission? Oh wait... there's a cute puppy who need my attention as well. It's so much more fun playing with puppy, don't you think?

Anyway, here's another card that distracted me from working on my tax. I shared this card on May Arts blog last week as part of OWH blog hop, but since I haven't share it here, I figure this cute gnome need to make an appearance here. :)


I think from There She Goes Stamp, this set called My Little Friend is still my favorite. It makes me smile every time I see the gnomes on this set. With their big eyes and funny expression, they just steal my heart. 

Hope this gnome makes you smile as well. Cheers....

Wednesday, April 11, 2012

May Arts Post

This week, May Arts is teaming up with Creative Imaginations and on Monday, I shared three cards on May Arts blog. You can see my complete post HERE. And, here's a look at one of the card.


I am not usually into vintage look stuff, but I think slowly it starts to grow on me. Especially when you get to play with patterned paper as beautiful as the ones on this Creative Imagination Iron Orchid Design Devotion collection.

Please check out May Arts blog for the other 2 matching cards that I made and there's giveaway every day at May Arts every day this week. So , check them out and make sure you check out the current post so you can enter the giveaway. :)

Monday, March 26, 2012

May Arts & Blog Hop Winner

Quick post. Today I have a fun project up on May Arts blog. This week we are teaming  up with Sweet Stamp Shop and I get to play with May Arts new burlap ribbon. Check it out & you can also win some fabulous goodies. Simply leave a comment on the blog post HERE.

And, thank you all so much for all your lovely comments on my Paper Crafts Practical Solutions blog hop post. I read all of them and appreciate them very much. The lucky winner from the blog hop is:


Comment #60 left by Lynda!! Lynda, congrats.... you win the Paper Crafts Practical Solutions. Please email me your mailing address. Thank you again to everyone and have a blessed Monday!

Thursday, March 22, 2012

Hey Gill.friend

I just have to share one more of my card that get published in Paper Crafts Practical Solutions, because this one is absolutely  my favorite from all the cards I made for this edition. 


I love this yummy stripe twill ribbon from May Arts and I save every scrap of this ribbon. They're too pretty to be thrown away. The way I look at it, every strip counts. :)

So happy that I can make a CAS card using this ribbon fish. I previously made this kind of ribbon fish a couple years ago like you could see on my blog header. I love this one even more, because I think the stripe twill pattern works so much better & makes it more fun compared to when I just used solid ribbon. Don't you agree?

Come back tomorrow for a couple fun blog hops. As always... if there's blog hop, there's giveaway, too. Oh yeah.... did you THIS official announcement? Yep.. I'm officially on board the Lily  Pad Cards crew now. Have a great Thursday everyone!

Monday, January 23, 2012

May Arts & Hero Arts

Hi all. Quick post for today. It's my day at May Arts blog. You can check out my post HERE.

This week we are  teaming up with Hero Arts!! And as usual, there's fab giveaway you can enter as well. All you need to do is leave a comment on May Arts blog. Here's a peek at one of the card.


Also, I want to wish a happy Chinese New Year to all my family and friends who celebrate it. May this year brings you health, joy, and blessings. Have a blessed Monday everyone! 

Wednesday, January 11, 2012

May Arts Ribbon Wreath Card

Hello. Quick post, just to let you know today is my day at May Arts blog. I am sharing tutorial on how to make this card below.


I actually made 2 cards. You can check  them out on May Arts blog

Sorry for the short post. I am super swamped lately and I really apologize if I haven't commented on your blog as often as I'd like to. I do still visit many of the blogs, just short on time for comments. I try though whenever I can. Things should be back to normal after February. I have CHA and my brother's wedding coming up, and I have tons of deadlines. Please bear with me.

In February I have some exciting stuff coming. Let just say, I am super excited for something that's card related that going up at the end of February. ;)

Thanks for stopping by here. Cheers....

Tuesday, January 3, 2012

I Adore My Mom

Today, my mom is celebrating her 70th birthday. If you have follow my blog for awhile, you know I adore my mom to pieces. So, this post is for my mom as she celebrates this milestone. :)

Of course, growing up, just like any other teenager, we had our differences. But, as I become an adult, there's nothing more that I want then hoping that when people sees me, I hope  they see her in me.

I realized (and I am proud of it) that I am quite a bit like her in many ways. We're both the serious one in the family, yet we can be very goofy as well. I get  my love for boxes & organizing from her. Yes, if you looks at my messy scrap room, you'll be like huh?? But, you can drop us at The Container Store and we'll be happy browsing there & checking out the cool & cute boxes, drawers, etc. She's a master in packaging efficiently.

My "Goofy" mom. :)

From her and my dad, I get my work ethic. To work hard, give your best, make sure you get your job done, ask question when you don't know. She's thoughtful and generous. She helped sending some kids to school, simply because she knows the parents couldn't afford it. No, she's not rich either, but she would put aside what she could to help them. And, only us, her kids, and the people she helps that know this. Her random act of kindness inspires me.

Me & my mom.

She thought us that the most important things in the world is family. That everyone else could come and go, but not family. Appreciate & love your siblings. She's the strongest person I know. And, most practical. My brothers and I sometime joke that she has a man's attitude in viewing things. She's honest and speaks her mind. 

Growing up, I struggle because I was so shy and wish constantly that I could be confident like her. One time I asked her how can she be so confident. And she told me that many times she's just as shy, but she push herself to face the fear. She taught me life is not always easy, but it's all about how you view things. She taught me to be optimistic, be positive, and be grateful for what I do have.

Christmas 2010.

Of all the things I treasure of our family, I treasure our family bond. That no matter how old we are, we still do things that we did when we're kids. Including, we still like to snuggle with her. LOL, especially me and my li'l brother, we're the babies!! Since we were kids, every time we're together, we always spend time in our parents room and everybody just piled up. This is where we share our stories, goofing off, or just simply enjoying each other company.

When you join the family, you simply join this tradition. :) I have to say that our family is very blessed that not only we love each other very much, but we have amazing in-laws. I think my mom can tell you that she's very lucky that all her children-in-laws love her. That says something, isn't it? Hubby loves to call her mama-san. :) And, yes, hubby adores her and wants her to move here with us. He did silly stuff with her constantly when she's visiting us.

Celebrating my mom's 69th birthday.

Today, my brothers and SILs are giving her a surprise birthday party, where they invited my mom's best friends, our uncles and aunts, and people that matter to her. My heart ache and I cry a bit, because I couldn't be there. But, I know she knows that I love her so much.

She always said she may not be rich in a material way, but she's so rich in love and family, and that she has  a very blessed life (even though she had some tough times growing up). She's still amaze every time we dedicate something to her (my brother dedicate his very first book to her). 

She doesn't realize her own value sometime. Or the impact she has on people's lives. Mom, you make a difference in your own way. All 3 of us have you to thank for all our good values. Thank you for raising me the way you did. For teaching us and be an example for us, to be kind to others, to stand up for yourself and what you believe in, to always appreciate one another.

Mom, I love you and I say it before and I say it again, I am so lucky and blessed to be your daughter. You're the best mom for me. Love you so much. Happy birthday and may God continue to bless you with all the things that makes you happy. xoxo... your daughter. :)

Friday, December 23, 2011

Christmas Cheer

Hi all, today is my day at May Arts blog. This week we are teaming up with Bazzill Basics (love, love, love them!) and I get to play with super cheerful papers. I made a card and a tag.

Here's a look at my happy card:


Want to see what the tags looks like?? Check it out at May Arts blog. And, would be so awesome if you could leave some loves. Spreading love is good, right. ;)

Let's see what else going on my world. How about crazy?? LOL, this year I am so behind. I am afraid I didn't even get to send out too many Christmas cards. I am working on finishing my brother's scrapbook like crazy. I want to give him and his fiance a meaningful presents and I always believe scrapbook is one of the most personal and meaningful present you can give.

I have about 6 weeks left to do this. You might say that's plenty of time. Not for me. When it comes to scrapbooking, somehow my perfectionism come out full force. Like everything has to be super straight and perfect. Especially because I want this album to be as special as can be. I can whip up a card in no time, but scrapbook, I am S.L.O.W. 

Oh... and another exciting news. See this?? That's my li'l brother's house-studio on the cover on Home Living magazine (Indonesia edition)!! Accck.... How awesome is that? I asked him to buy a copy for me. :)


Congrats, Jerry!! If you check out that link, you'll be entertain by some amazing photographs. I couldn't be more proud of both of my brothers. They're both so successful, but most importantly... they love me like nobody business and spoil me whenever they can. I couldn't ask for better brothers. Love them both so much!

Thank you all for stopping by and enjoy your long weekend!!

Santa's Helpers

Hello friends. Am popping in on my often neglected blog to share a couple cards I made featuring Spellbinders'  Santa's Elves dies s...