Sunday, December 18, 2022

Take Heart

Hi all. Phew, what a month. I truly feels like this months just fly by like  crazy. Then again, I always feel like this every December. However, I am very grateful that my mom is here with me this time and soon I get to take her home and we'll get to celebrate Christmas with my brother. I am so looking forward to it.

Now, let's get on to card. Today, I am showcasing a very cozy, homey set from Spellbinders' called Log Cabin & Flower Mini Quilts Etched Dies.


I die cut the quilt from three colored cardstock and assembled them directly on the card base. Then, I die cut the word hugs. This die also come with the set. Once that done, I stamped a sentiment from Quilty Hugs Sentiment set. As soon as I saw this sentiment I knew right away this is a sentiment that I want to use as I just love and connect to the message. Finished by adding some enamel drops.

I think this is such a fun pattern t play with. Wish I have the talent to make real quilt, but hey, not all of us can be good at sewing, right? So, paper quilt it is. Well peeps, that's all from me today. Hope you enjoy today's card. Happy Sunday!

Monday, December 5, 2022

Spellbinders December Club Kit

Hello everyone. Happy December. Today, Today, I have new Club products from Spellbinders projects to share with you.

Spellbinders Clubs are easy and fun because there is no minimum commitment and one can join/cancel any time from the account (you don’t need to reach out to Customer Support to do it, it is all straightforward). You can read the total Clubs FAQ HERE.

First card featuring my favorite from this month, the Large Die of The Month Set.


I basically die cut all the pieces from white cardstock and then colored the cardstock with ink blending. For the leaf part, I die cut them 3 times so I can create a thick layer to make it stand out more. Adhere all the flowers and I add some enamel drops. For sentiment I used one of the hot foil sentiment from More Sentiments Hot Foil set. Finish the card by adding a couple tiny birds from Spellbinders' Sealed Birds Etched Dies.

Next card is featuring Spellbinders' December Small Die of The Month.


I decided to just do the stitching on the heart part and I used rhinestones on the small circles as I wanted to have some bling on this card. I pretty much keep the design simple and clean.

I love hot foil, so needless to say, I love the Spellbinders' December Glimmer Hot Foil of The Month set.


I also keep the design simple and clean here. Sometimes less is more in my opinion. And, if you have been following my blog for a while, you know that I like to use non traditional color here and there. Valentine tends to be pink and red, but hey, I love aqua colors, so why  not go aqua for Valentine? I am a rebel, I am telling you. Hah!! Just kidding. I just like using random color, I guess.

I hope you enjoy looking at the cards I made & I wish you all a lovely December.

Tuesday, November 29, 2022

Heart Christmas Wishes

Hi all. Today, I am sharing this card I made using Spellbinders' Essential Solid Heart Glimmer Hot Foil plate. This hot foil plate can be used for variety of occasions from Valentine to birthday to thinking of you, etc. However for today, I chose to use it for Christmas card, cause 'tis the season. :)


I combined the solid heart with my left over hot foil from previous card HERE, where I used the Poinsettia from Spellbinders' October Glimmer Hot Foil of The Month set with Prism hot foil roll. For the background I turned to one of my favorite, the Beveled Diamonds 3D Embossing folder. I think this is such a timeless background. Trim the panel and adhere to card base. Add the heart and finish with sentiment. For the sentiment, I combined strip sentiment from Mini Christmas Sentiment Strips Glimmer Hot Foil with die cut sentiment from Spellbinders' October Small Die of The Month.


As you can see, the Prism hot foil shine beautifully in myriad of colors depends on where the light hits.

Short and sweet as always. My mom is here right now, so am keeping my crafting and blogging time down as I want to spend some times with her. It feels great to have my mom here after 4 long years of not being together. Thank you all for stopping by here.

Wednesday, November 16, 2022

Flower Frenzy

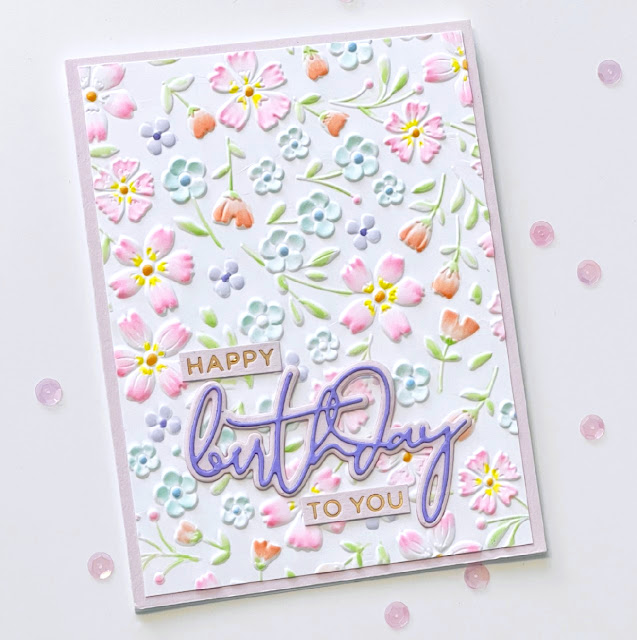
Hi all. Today I am featuring Spellbinders' Flower Frenzy embossing folder. I love the flowers on this folder. And, they're actually pretty fun to color!


I simply embossed a cardstock panel with the folder and then used Copic markers to color the flowers and leaves. Yes, I went totally with spring color. Am thinking ahead here. Hah! And, for the sentiment I used More Sentiments Hot Foil and Yana's Layered Script Sentiments.

Now, my next card is actually an accident card. You know, that piece that  you're about to toss away, but decided for the heck of it, just play with it to see if you can save it. 


I always have a hard time just tossing paper or cardstock out. The environmentalist in me insist that I shouldn't be wasteful. I originally blended in soft green on this embossed panel and I wasn't too excited about it. Before throwing it out, I figure let's see what happened if I added some blue and aqua color to it. I figure I added color that could work with the green. At the end, I kind of liking the unusual color combo and ended up making it into an extra card.

Hope you enjoy today's cards and may you find something good or hopefully several good things in your day today. 

Wednesday, November 9, 2022

On Your Special Day & A Little Announcement

Hi peeps. Have you checked out the latest release from Spellbinders? I am so excited when I saw this Sealed Bouquet Etched Dies set. If you have followed me for a while, you know how much I love playing with flower dies.


I simply die cut the flower pieces from various color cardstock. I also die cut some pieces from Sealed Squiggles Etched Dies. For the background I embossed a panel of cardstock using Dazzling Dots Embossing Folder. Then, I arranged all the pieces on the card. Once that done, I tied together the bouquet with strings die cut with Sealed Twine Etched Dies. For the sentiment I hot foiled a sentiment from Yana's Special Sentiment Hot Foil Plate.

I am so in love with this set. Seriously, you can make a simple bouquet of fill up a whole card with it. I am really hoping to play with this set more. Now, if only I can find the time. Hah! 

Yep, cause guess what? I got news to share. My friend and I decided to start new joint venture called Sunshine by Designs TX where we make personalized gifts and ornaments. You can find us HERE on FB page and HERE on Instagram, as for now since we just started, I haven't started an online shop, yet. We just go by word of mouth at this moment. If you're interested on any personalized ornaments just message or email me me. Below are some samples of the stuff we've done. 

For the cutting board, we can personalized it with your favorite family recipe, for the ornaments, we can add your family name or special date and of course we can add any picture to an ornament as long as you send us high resolution picture. Please feel free to email me with any questions and wish us luck.

Monday, November 7, 2022

Birthday Birds

 Hi all. How's it going? How are you adjusting with fall time change? I always struggle with the time change in the fall, just because I feel like it gets dark so early! Well, with more times indoor, might as well get more crafting done, right?

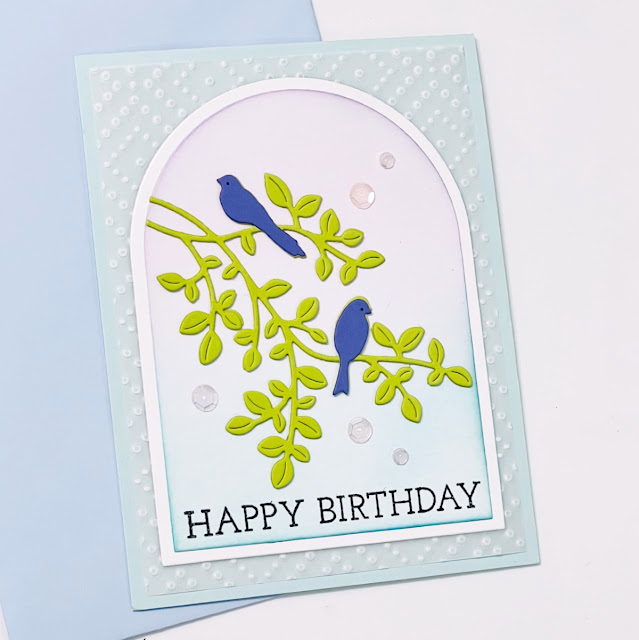
Today, I am showcasing Spellbinders' Sealed Birds Etched Dies.


Besides flowers, birds are my favorite image to play with. For this card, I start by using Dazzling Dots Embossing folder on a piece of vellum panel. Trim it and adhere to card base. Next, I die cut the birds on the branch three times and layered them together so they stand out a bit more. Then die cut a couple arch frame using  Essential Arches Etched Dies. I ink blended blue & purple ink on the smaller arch and then adhered the birds on the branch. Trim the extra branch and layered it with the larger arch frame. Adhere to card base and finish by stamping the sentiment and adhere some sequins.

I need to remember to play with vellum more often. I often forgot that I have them. This is why I like to have my supplies visible. If I have them in a drawers, I tend to forget I have them. That's all I have for today peeps. Thank you for stopping by here.

Tuesday, November 1, 2022

Spellbinder November Club Kits

Hi everyone. Happy November. Hope you all are doing well. I am back today sharing some cardmaking inspiration. Today, we have new Club products from Spellbinders and I have three projects from 3 of the monthly sets to share with you.

Spellbinders Clubs are easy and fun because there is no minimum commitment and one can join/cancel any time from the account (you don’t need to reach out to Customer Support to do it, it is all straightforward). You can read the total Clubs FAQ HERE.

First card is one I made using Spellbinders' October Glimmer Hot Foil of The Month set which I paired with Geometric Flower Background Glimmer Hot Foil from October release.


I started by hot foiling the background and then fill in the open space using the coordinating stencil. Once that done, I hot foiled the flowers and leaves from the October glimmer set and die cut it. Colored with Copic markers, For the sentiment I used one of the sentiment from More Sentiments Hot Foil and adhere it to the card with foam adhesive. Then I arranged all the flower and leaves on the card.

For my next card, I used  Spellbinders' October Small Die of The Month. I love, love, love this set!


Anytime I get to work with flower dies it always bring me great pleasure. How could I not, when I get to play with such beautiful set. I simply die cut the pieces from various color cardstock and arranged them on the card. Sentiment again from More Sentiments Hot Foil set. Finish by adding enamel drops to the center of the flowers.

Last but not least, my third card featuring Large Die of The Month Set.


The layering on this set is beautiful & elegant. And the whole card actually came together pretty quick.  

That's all I have for today. I hope you find today's cards inspiring and hope you find some times to get crafty this week. May this month be a good month filled with many blessings for us all.

Geometric Flower

Hi all. Today, I am  featuring Spellbinders' Geometric Flower Background Glimmer Hot Foil from the Sealed by Spellbinders Collection. I love this plate as it has a contemporary look to it. And, it comes with matching Layered Geometric Flower Stencils.


I first hot foiled the background with one of my favorite hot foil the Matte Gold hot foil roll.  Then I used the layered stencils to color the openings. For the sentiment I used More Sentiments Hot Foil and Yana's Layered Script Sentiments.. To finish I added some enamel drops to the center of the flower.

This card comes together pretty quick that I actually did another background panel with this same set. Ready to be use for another card. :) Well, that's all from me today. Wishing you all a beautiful day.

Tuesday, October 18, 2022

Folk Art Ornaments & Winter Wonderland

Hi all. Today, I am sharing some cards featuring a couple sets from this month Spellbinders' release. First up, is this card I made using Spellbinders Folk Art Ornaments Stamp & Die set


How gorgeous are these ornaments? I just love the designs/ I simply stamped the ornaments, colored them with Copic and die cut them. I decided to add some shimmer with metallic watercolor to make the ornaments shine. For the background I used my favorite holiday embossing folder, the Ski Lodge  Embossing Folder. I am obsessed with this embossing folder!! Finish the card with hot foiled sentiment from Mini Christmas Sentiment Strips Glimmer set. I used this set on this card and the next two cards below.

The next card featuring the Winter Wonderland set.


For this one, I used Leafy 3D Embossing folder for the background. I love this image, so I ended up making a second card and just varied the design a bit.


Last but nit least, another card using the deer image from the same  Winter Wonderland set.


How sweet is this deer? As you can see, I love playing with embossing folder. For this one I used Argyle Socks Embossing folder.

I hope you enjoy today's cards. That's all from me today. May your day be a good one/ Cheers..

Saturday, October 15, 2022

Spellbinders' Vintage Camera

Hi all. Today I am showcasing one of the new release product from Spellbinders. When I first saw the 3D Vignette Collection by Becca Feeken, I knew right away I 'd pick  the 3D Vignette Twin Lens Camera Etched Dies. I come from a family that loves photography and my younger brother actually has a small camera collection including a couple vintage one. So, I knew I'd have fun playing with this set and I was right. :)


I decided an aqua color camera would be cool looking.  Besides, the color match my crafting room color. Hah!  The cool thing about this project, is the fact that you can flat it, so you can actually mail it!! How cool is that? Once the camera part's done, simply pick the pictures that you want to use for the insert. Of course,  you could also just decorate each insert and create fun art pieces. I used our doggies pics.


There are 4 slots inside the camera, but I only have 3 dogs, so I only did 3 insert. I'll do the 4th when I can manage to take good pic of all our 3 dogs together or I might just do a journaling card.


On my Instagram I'll share a short clip of this project. That's all from me today and I hope you all are having a good weekend.

Tuesday, October 11, 2022

The Ton Fall/Holiday 2022 Release

 Hi all and welcome to The Ton Fall/Holiday release. I am so excited to share this release as the sets are simply beautiful & fun. As soon as I receive my package, I got busy playing.


First up, is my favorite from this release, the gorgeous Coming Up Iris stamp set..


I heat embossed the flower on watercolor cardstock, add the watercolor it and once dry, I die cut it with Climbing Iris Coordinating die. After debating whether I should use colored cardstock or not, I ended up adhering it to plain white cardstock as I feel the white really make the flower pop. And, more often than not, simplicity let things shine in my opinion.

Next, I played with Belated Iris stamp set (this set also coordinated with Jumbo Iris Layering Stencil , which I used below on my 3rd card).


I paired the Iris with a strip of rainbow strip that I created with alcohol ink. Heat embossed the Iris, add watercolor, die cut it with Jumbo Iris Coordinating die, trim and adhere to card. Finish the card by adding sentiment and some Light Purple Opaque Rhinestones.

For my 3rd card, I am showcasing Jumbo Iris Layering Stencil. Seriously, I think Iris is one of those flower that's so much fun to color. I mean, I just go wild with the color combo. :)


Here, I thought the pine branch from Holiday Cones Outline (older but timeless set) would make a fun background for this flower. I kind of like the light feathery look of it. What do you think?

Now, how about a couple Christmas cards? The Jolly Season Large Stencil is sooo fun! You can keep it simple with just a few color of you can go with more colors that make it even merrier. This stencil cover a whole cardstock sheet and you can get 4 cards done at the same time or you can just use one section at a time.


Below are a couple of the cards that came out from the sheet above. I'll share the other 2 cards on my Instagram later on.


Fun & merry Christmas cards, right? I really love playing with The Ton large layering stencil. The gorgeous design is my top reason and second, I can get 4 cards done quick this way. My teammates has work hard to make awesome projects for this release. Please visit their blog below & leave some love. Let us know what you think of this release. Happy Tuesday!!

Wednesday, October 5, 2022

Teal & Red Poinsettia

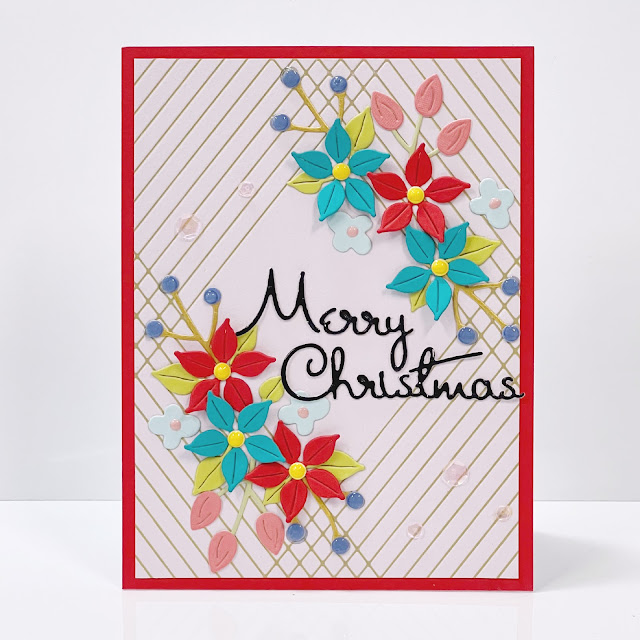
Hi all. Today, I am sharing Spellbinders' October Small Die of The Month set. Every month, Spellbinders continue to amaze me with their monthly club kit and this month is no exception.


For my card, I started with a panel that I hot foiled with Crossed Line Cardfront Gimmer Hot Foil Plate. Next, I die cut the flower pieces from various colored cardstock using Small Die of The Month set. Arrange and adhere them on the card base. Finish by adding the sentiment (it comes with the set) and some sequins. Again, another Christmas card in non-traditional colors. I mean,  that's what being crafty all about right? Create with whatever colors that make us happy.

Hope you enjoy today's card. Have a fabulous day y'all.

Sunday, October 2, 2022

Stitched Ornament

Hi everyone. Today, I am showcasing Spellbinder's October Large Die of the Month set
Spellbinders Clubs are easy and fun because there is no minimum commitment and one can join/cancel any time from the account (you don’t need to reach out to Customer Support to do it, it is all straightforward). You can read the total Clubs FAQ HERE.


With this die set, you can make a simple card, or you can also go big and make a fancy 5x7 card. Yep, this whole thing actually lay flat, so you can ship it easily. I started with 5x7 cardstock panel that I embossed with Argyle Socks Embossing Folder. Then I used the display dies to create the display frame to hang the ornament.


And, the best thing about sending card like this, you can always take the ornament off the display frame and use it to decorate your Christmas tree. Fun, right?


I hope you enjoy today's project. Spellbinders Clubs are of great value and quality. There are multiple “value” Club options available, too, if you wish you get multiple Clubs. Feel free to email me if you have any question about it. 

Saturday, October 1, 2022

Spellbinders' October Glimmer Hot Foil of The Month

Hi all. Happy October! Yep, we're officially entering the last quarter of 2022. Time flies, isn't it? After a hot summer in Texas, I am grateful for the cooler weather.

Today, I have a beautiful hot foil set to share. Introducing Spellbinders' October Glimmer Hot Foil of The Month set. As soon as I saw it, I was in love.


The background was what I called happy accident. I was using the Dazzling Diamonds Glimmer Hot Foil Plate on a piece of folded cardstock and the top piece was foiled perfectly (which I used on previous card HERE) and the second layer has this beautiful embossing.. So, I simply saved it for my next project, which is this one. Next, I hot foiled the Poinsettia with Matte Gold hot foil roll., die cut and colored it with Copic markers. Adhere it to the card with foam adhesive. Then I foiled the sentiment that comes with the kit. Die cut and also adhere it with foam adhesive. I finished the card by adding some rhinestones.

I love the way this card turn out. Well pees, I hope you enjoy today's card.  Stay tune for more Spellbinders in a coming day.

Tuesday, September 20, 2022

Puppy!

Hi all. As someone that loves dog, I am definitely excited when I found out I get to play with this adorable set from Spellbinders called Special Pet Delivery Etched Dies. I have to say though, if you do plan on getting someone a puppy as present, please make sure they really want it and ready for it. I am a firm believer in having a puppy is a for life commitment. I don't believe in getting rid of a dog simply because they outgrow their puppy phase or because they're no longer look cute. Okay, okay off my soap box. Sorry, I just had to say that. :)


I knew right away that I want to pair this set with Geo Screen Embossing Folder and I ink blending various blue hues on the panel before doing the embossing. Adhere the panel to card base. Next, I die cut the puppies image and also the box which from previous release called Surprise Box Etched Die set. I ink blended some ink on the box to create shadow and then put together all the pieces. Somehow I felt the box was a bit too plain, so I added a couple heart from a stamp set that was part of past monthly club. To finish the card, I simply added hot foiled sentiment from More Sentiments Hot Foil set.

Well, that's all I have for my post folks. Have a wonderful day.

Saturday, September 17, 2022

Love, Hope & Joy

Hi everyone. Today, I am back with a Christmas card featuring the same Spellbinders Folk Song set that I used on my previous set. I love this set. It reminds me of Scandinavian design, which I adore.


To start I die cut all the pieces for the bird. I adhered a dark blue cardstock behind the bird that I just hand cut. Put the bird aside and I start working on the wreath. Added a poinsettia from Holiday Blooms Etched Dies set. For the sentiment, I hot foil one of the sentiment from Mini Christmas Sentiment Strips Glimmer Hot Foil and finally finish the card by adding some enamel drop on the dots on the tail.

I think I am in love with this set. That's all I have for now. Have an awesome weekend!

Thursday, September 15, 2022

Folk Song

Hi everyone. Today I am featuring one of Spellbinder's new September Winter Tales collection called Folk Song Etched Dies. This new set by Zsoka Marko is simply fantastic. I love her style.


This set is perfect for Christmas, but versatile enough to be used for non Christmas card, like I did on my card, I thought this design would make a fun birthday card. I started by die cutting all the bird pieces. Following the bird shape, I hand cut a smaller piece from light blue cardstock so it showed up through the opening on the bird. Next, I die cut a bunch of leaves.


For the background, I used Dazzling Dots Embossing folder. Adhere the embossed panel to card base. Next, I layered the leaves. In person, you could see the layering of the leaves is pretty thick and dimensional. I love it. I also added a little flower from Be Bold Blooms set to complete the end of the wreath. Then adhere the bird with foam adhesive. I don't have the Enchanted Garden set, so I did the next best thing to create the bell flower border. I used the top of the ornament from Spellbinders' Stitched Ornament Etched Dies and then just trim the the top part, the one with the hole. And, tadaaa... you get a bell shaped flower. :) Yes, I was pretty proud of myself that I thought of this. Hah!!

Finished with hot foiling sentiment from More Sentiments Hot Foil set. So, what do you think? I hope you like it. Well peeps, that's all from me today. Stay tune for the Christmas version of this set. Till next time.

Sunday, September 11, 2022

Fall Birthday Card

Last week, I made a card using Spellbinders' September Glimmer Hot Foil of The Month set and change the center of the set from the supposed diamond shape to circle. Well, I love that set so much, that I decided to make another card and this time showing it's original diamond center shape. 


I hot foiled and die cut the leaves frame. Then colored with some random ink blending. Die cut the diamond center and put aisde. Next, I worked n  the background, which I embossed with.Dazzling Dots Embossing folder. I love this background, cause literally I could use it for any occasion. It makes interesting background without taking away from the main image. Adhere panel to card base and then arrange the leaves frame. For the sentiment, I used one of the sentiment from Yana's Sentiment Glimmer Hot Foil Plate and adhere it to the card with foam adhesive. I actually almost consider this card done after that, but decided to add a couple more leaves and flower.


Hope you enjoy today's card! 

Thursday, September 8, 2022

Spellbinders' September Large Die Set

I have to admit that usually I am not that much into making fall theme card. But, when I saw Spellbinder's September Large Die of the Month set, I thought, oooh, this one is a fun one to play with.


I found that as long as I incorporated some teal or pink to my fall card, I love it better. I don't know, I just  need something besides yellow, brown, orange mix. I die cut all the pieces for this card from white cardstock and colored all the pieces with Copic markers. Done with the coloring, arranged all the pieces on the panel that I embossed with Dazzling Dots Embossing Folder. Finished by adding the sentiment and some enamel dot stickers.

Well peeps, that's all from me today. Hope you enjoy today's card. Till next time.

Monday, September 5, 2022

Spellbinders' September Small Die

Hi there. Today, I am sharing Spellbinders' September Small Die of The Month set, which is one of the many Spellbinders club kit. 


I die-cut several of the leaves from the set and added some colors with ink blending. Once that done, I added the stitches and once I completed the stitches I layered them with their coordinating back. Put aside. For the background, I embossed a panel with Leafy 3D Embossing folder. Gently colored the panel by adding some green ink blending. Adhere the leaves with foam adhesive and tucked in silver threads underneath. Finish by die cutting the sentiment that comes with the set.

Pretty easy peasy. Well, almost. Hah! The stitching is a little extra work, but since the eaves are small, I got the stitching done pretty quick. 

Hope you get some crafting done if you have day off today. Wishing you all a gorgeous day.

Sunday, September 4, 2022

Spellbinders September Glimmer Hot Foil Set

Hi all. I am excited to share the card I made using Spellbinders' September Glimmer Hot Foil of The Month set. I have to admit this card came out better than the way I envision it. As I work on it, I keep making changes here and there from my original plan & am happy with the result.


To start, I ma
de the background using Beveled Diamonds 3D Embossing folder. Adhere the embossed panel to the card base. Next, I hot foil the leaves from the set 3 times with Aura hot foil roll. Color them with come ink blending and die cut it with the coordinating die. At first, I was going to use the diamond shape for the center of the leaves, but then I thought I should do something different. I decided to use a circle for the center. So, I hot foil the sentiment and die cut it with a circle and ink up some color around the circle. Then I added liquid glue on the back of the circle and went ahead adding and trimming the leaves as I filled up the circle. Then I adhere the whole wreath with foam adhesive. 


I hot foil the flower that come with the set a few times and also die cut some branch from gold cardstock for filler. Tuck them in around the wreath and finish by adding some sequins. 

That's all from me today peep. I hope you enjoy today's card and may your Labor day weekend be a good one. Cheers. 

Friday, September 2, 2022

Simon Says Stamp STAMPtember


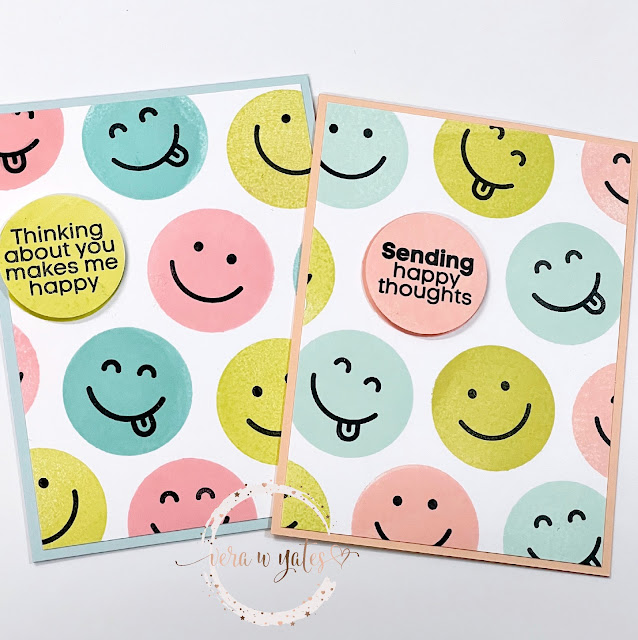
Hi all and welcome to STAMPtember®! Cardmakers from all over the world are celebrating with Simon Says Stamp, including me. I am always excited for STAMPtember® and looking forward to the collaboration reveal between SSS and other companies.Anyway, as we kick off the celebration, I am featuring this fun Happy Face set and made a couple cards that I hope make whoever received them smile.


I started by stamping the circles in various color then I stamped the face. Originally, I was going to use a strip sentiment, but I made a booboo and ended up with the circle sentiment to cover it, which is better than my original plan. This is what I call happy accident. Hah!!


I simply change the color variation a bit for my second card. Other than that, same steps and all.
By the way, Simon Says Stamp also have several special offer going on. One of them is below, a free Layered Dots stencil with a purchase of $30 or more. 


Let's get this party going shall we? Head on to Simon Says Stamp blog for links to all the blogs that joining the STAMPtembver celebration. Cheers....

The Ton December Release

Hi friends. Welcome to The Ton December release. We have quite a few fun, goodies line up for this release. But, as bird lover, I just have ...